Uncategorized
How to Easily View Columns in Microsoft Word 365: A Step-by-Step Guide
Navigating through Microsoft Word 365 can sometimes feel overwhelming, especially when dealing with advanced formatting features like columns. Whether you’re creating newsletters, brochures, or professional reports, the ability to see and manipulate columns effectively is essential. However, for many users, this feature can be tricky to locate and manage. In this article, we will guide you on how to see the columns in Microsoft Word 365, answer frequently asked questions, and provide valuable tips to make your Word experience seamless and efficient.
By the end of this guide, you’ll have the knowledge to confidently use and view columns in your documents, ensuring that your content is well-organized, professional, and visually appealing.
What Are Columns in Microsoft Word 365?
Columns are vertical sections that allow you to organize text side by side. This feature is commonly used in newspaper-style articles, flyers, newsletters, and academic documents to enhance readability and visual structure. Unlike regular text alignment, columns create a structured layout that can guide the reader’s eye across the page.

How to Add and See Columns in Microsoft Word 365
To view and edit columns in your Word document, follow these steps:
Step 1: Open Microsoft Word 365 Document
- Open the document you wish to format or start a new one.
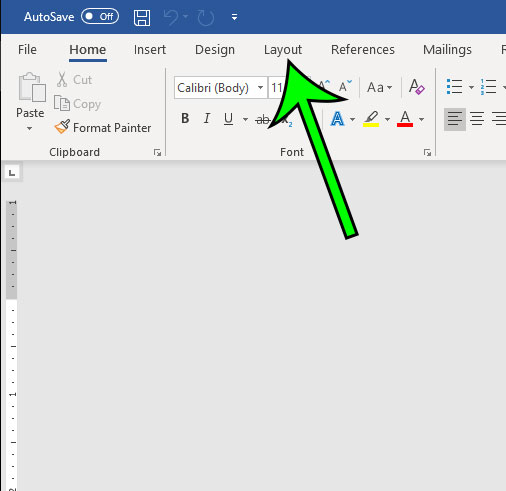
Step 2: Go to the “Layout” Tab
- Locate the “Layout” tab in the ribbon at the top of your screen. This is where most page formatting tools are found.
Step 3: Click on “Columns”
- In the “Page Setup” group, click on “Columns.” A drop-down menu will appear with options like One, Two, Three, Left, Right, and More Columns.
Step 4: Choose Your Desired Column Layout
- Select the number of columns you want. If you need a custom configuration, select “More Columns” for additional settings like column width and spacing.
Step 5: View and Adjust the Columns
- Your document will now display the selected columns. To view how your content looks, you can switch to “Print Layout” or “Web Layout” under the “View” tab. Adjust the settings as needed.
FAQs
Sometimes, you may not see the columns due to the current view mode. Make sure you’re in “Print Layout” or “Web Layout.” The “Draft” view mode does not display column formatting.
Yes, Microsoft Word 365 allows you to adjust the width of each column. Under the “More Columns” option, you can manually set the width for each column to create a custom layout.
To revert to a single column, go to “Layout” > “Columns” and select “One.” This will remove any additional columns and return the text to a standard, single-column format.
Yes, you can use the “Section Break” feature. Insert a section break where you want the columns to change, then set up a different column configuration for the new section.
Tips for Effective Use of Columns
Tip 1: Utilize the Ruler for Precise Adjustments
The ruler tool is an excellent way to fine-tune your columns. Activate the ruler by going to “View” and checking the “Ruler” option. You can then drag the column markers to adjust their width directly.
Tip 2: Use Breaks to Control Text Flow
If you want specific text to start in a new column, use the “Column Break” feature. Place your cursor where you want the break and go to “Layout” > “Breaks” > “Column.” This ensures text aligns perfectly across columns.
Tip 3: Preview Before Printing
Before finalizing your document, always use the “Print Preview” feature to see how the columns will appear on the printed page. This allows you to make any last-minute adjustments.
Benefits of Using Columns in Word Documents
Using columns can significantly enhance the readability of your content. Here are a few benefits:
- Improved Organization: Columns help in categorizing information, making it easier for readers to follow the content.
- Professional Layout: Columns give documents a polished, professional appearance, especially in marketing materials and newsletters.
- Enhanced Readability: Readers can quickly scan and absorb information, which is particularly useful for content-rich documents.
Common Issues and How to Fix Them
Issue 1: Uneven Columns
- Solution: Go to “Layout” > “Columns” > “More Columns” and uncheck “Equal column width.” Adjust each column individually until they’re balanced.
Issue 2: Text Overflowing Outside Columns
- Solution: Check your column width and spacing settings. If necessary, reduce font size or increase the spacing between columns.
Issue 3: Difficulty Moving Between Columns
- Solution: Use the “Column Break” feature or manually press “Enter” to control where text appears in each column.
Why Is It Important to Master Columns in Microsoft Word 365?
Mastering columns can save you time and make your documents more visually appealing. By effectively using columns, you can ensure that your reports, brochures, and other written materials look clean and are easy to read. It also allows for better organization of content, which can be particularly useful in business settings where clear communication is crucial.
Conclusion
Columns in Microsoft Word 365 are a powerful tool that, when used correctly, can elevate your document’s design and functionality. Whether you’re creating newsletters, organizing data, or simply want to make your text more readable, learning how to see and manipulate columns is an invaluable skill. By following the steps and tips outlined in this article, you’ll be able to confidently use columns in your documents, ensuring a polished and professional result every time.

